Photo retouching is one of the many techniques used by photographer in enhancing and making their images beautiful. This technique, photo retouching, is very useful to them as photographer since they can edit, add and change some parts of the photo that are not as good as they want. Almost all photographers around the world use photo retouching technique in doing such kind of image editing.
In this tutorial, I am going to introduce the technique, photo retouching, used by photographers in editing images. Just follow the steps below.
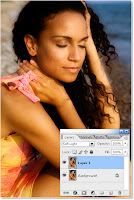
1. Open the image you want to retouch. For an instance, I use an Indian lady with dark skin image for us to see the real changes after this tutorial.

2. Go to Layer > Duplicate Layer to duplicate the existing layer which is the image that you want to retouch. Change the Blending mode to Soft Light 100%.
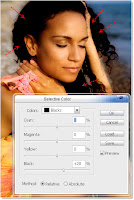
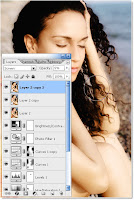
3. Change the settings on the Selective Color by going to Image > Adjustment > Selective Color. Add 20% to black color setting of color Black. See screen shot below.
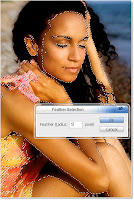
4. Using the Magic Wand Tool ( Q ), select the skin area of the Indian lady and set the feather radius in the Feather Selection tool ( Alt + Ctrl + D ) to 5px.
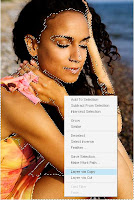
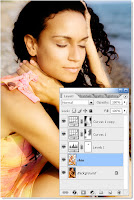
5. Copy the Selection into a new layer. By doing so, right click on the Selection then select Layer via Copy option (Ctrl + J) and name it “skin”.
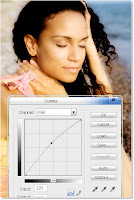
6. Go to Layer > New Adjustment Layer > Curves to add an adjustment layer curve. Set the Input to 120 and Output to 147.
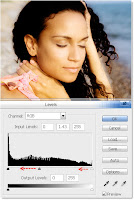
7. Again go to Layer > New Adjustment Layer > Level. This time select the Level option to create a Level Layer.
8. Duplicate some adjustment layer if it doesn't strong enough.
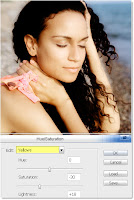
9. Add Hue/Saturation Layer. To do this: Go to Layer > New Adjustment Layer > Hue/Saturation. Set the Hue to 0, Saturation to -30, Lightness to +18.
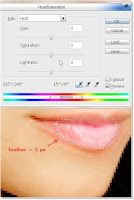
10. We are now finished retouching her skin. Now we proceed to her lips. Pick a Lasso Tool and draw the selection around her lips. The same with her skin set the feather radius to 5. To do this, repeat what you have done with step 4. Add Hue/Saturation Layer for her lips.
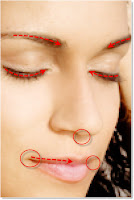
11. Now we have to shave something in her face. Select the layer you named earlier as “skin.” Pick the Burn tool to darker some dark area in her face like the eyebrows, eyelashes, etc.
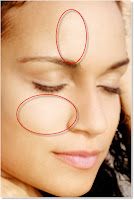
12. The screen shot below are things that we need to fix since the areas are so bright.
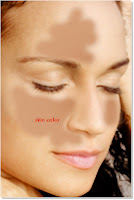
13. Use EyeDropper Tool to choose a skin tone color. Make a new Layer and then use Soft Brush draw into bright areas. Be sure that you draw it on the new layer that you created. Change the Blending mode to “Color.” Then add a filter effect on it by going to Filter > Blur > Gaussian Blur and set the radius to 7px. (note: you can adjust the radius from 5px to 10 px).
14. Add one more adjustment layer (Photo Filter) and set the density to 10%. You can find this Photo Filter by going to Layer > New Adjustment Layer > Photo Filter.

15. You should make a copy-of-merged-layer by using Image >> Apply Image ( on new blank layer ). And change the blending mode to Screen and decrease its Opacity.
Note: You can use Dodge and Burn Tool to shading some skin areas that are incorrect.
Note: You can use Dodge and Burn Tool to shading some skin areas that are incorrect.
Result:
Before the Photo retouching
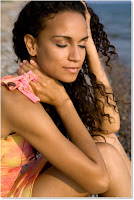
Before the Photo retouching
After the Photo retouching
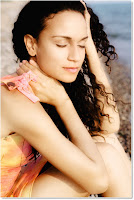
Photo retouching in Photoshop


1 comments:
Thanks so much for the re-touching technique. photoshop has so many options and features, who knows where to start. I'm a photographer and re-touching is basically what I use photoshop for. Coincidentally, I still use CS2 on with Vista Home Basic, I couldn't get CS3 to install or upgrade. Any suggestions.
http://thecanonconnection.blogspot.com/
Post a Comment